
REPAIR+UPGRADE: Dart Zone Pro MK-2 Plunger Rod
With the DZPMK-2 being a couple years into it's lifespan more and more people are reporting broken plunger rods, rendering the blaster inoperable. This happened to myself last year and while I could've paid Dart Zone to send a replacement part I didn't want to spend money on something that would ultimately break again. So a year later I decided to open my MK-2 back up to see if I could repair it with some common modding materials.
You will need:
- Super/Gorilla Glue
- Epoxy
- Plastic or metal material ~ 1.6mm x 3.2mm x 32mm to make shims. I used the cut-down side panels of 2x4 Lego plates.
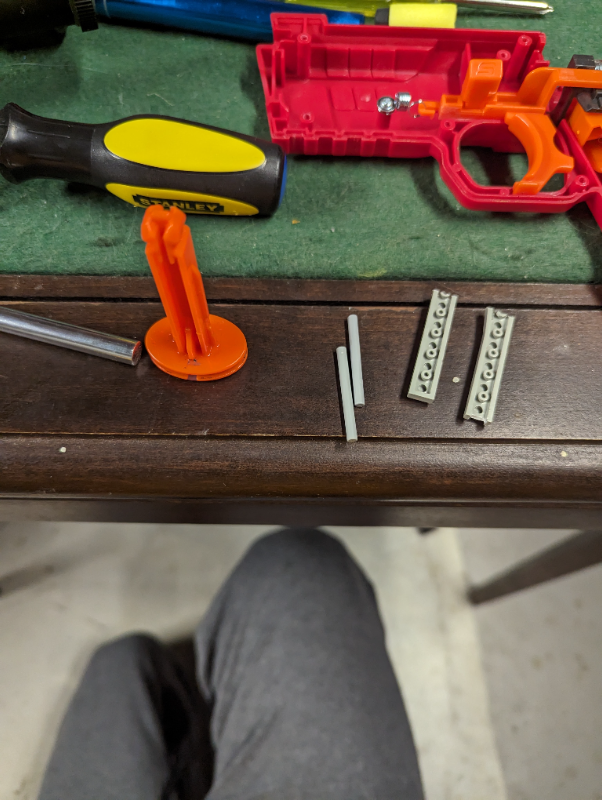
Step 1: Photo #1 referenced My plunger rod had a clean break across it so I started by gluing the 2 pieces together, so that I wouldn't be fumbling with epoxy covered parts later on. This step can be optional but there's no reason not to. If your plunger rod does not have a clean break, and is warped, you may need to do some additional work to get the pieces aligned. The glued-together plunger rod is pictured in photo #1 next to the shims that were made for step 2.
Step 2: Photos #1-4 referenced I used wire cutters to trim off the sides of Lego plates to create my shims, if you have a metal alternative you may prefer to use that. You can choose to not use shims and simply skip to Step 3 but the goal here is to add some material to the plunger rod, perpendicular to the break-point for added strength. You will need to make 4 shims to place along both "walls" of the PR on both sides. You should also make 2 shims to act as a spacer for your main ones. In pictures 2 and 3 you will see that my shims(+epoxy) extend as far as the catch point on the PR. DO NOT DO THIS as it will interfere with notches in the catch mechanism that help align the PR. Use a shorter Lego/material that does not extend between the catch points on the PR, as pictured in photo #4 where I drilled out a part of my red lego shim from photo #3 that was interfering.
Step 3: Photo #2-4 referenced Fill er up with epoxy and let it dry overnight. Just make sure your epoxy isnt runny enough to leak from the applied area. Once your epoxy is set you are good to reassemble the blaster and test the catch. If you are failing to catch then your middle shims (red ones picture in photos #2+3) are likely too long. Assuming you used the tried and true Lego-jank you should be able to easily drill out the extra material that's blocking your catch with a drill bit that is roughly the same size as your shim.
Congratulations you have successfully repaired your Dart Zone Pro MK-2 with a stronger part than Dart Zone themselves offer! I have been able to test this in a couple games as well as lots of plinking around the house and it seems to be holding up with no issue. If the PR fails again I will be sure to heavily modify this post to reflect whatever newfound info arises.
- 130 fps
- Single Shot
- Similar Builds
- "MK2.2"
Dart zone pro mk2 with a suite of fixes and tweaks, including a improved trigger...
- More By kryosse
- DanPistol
Dan has outdone himself again with the new pistol. It's a lot chonkier than most...
https://www.printables.com/model/994490-dan-pistol-short-dart-blaster-by-orion-blasters


Report Build
Editing Build
Editing Internals
BarrelPlunger
Editing Media
Sign In to DartSweep
Just enter your email address below, and we'll send you a single-use use code in order to sign in — easy peasy.
If you're new here, we'll just ask you for a few details and then create an account for you automatically.